
Japanese Manga Machine Translation Experience (3) - BallonsTranslator
This article is translated by AI.
Archive Directory
Japanese Manga Machine Translation Experience (0) - Table of Contents
BallonsTranslator Project Address
Resource Transfer
Files shared via network disk: BallonsTranslator Link: https://pan.baidu.com/s/1IDiIVm3yoYjB5ATC3DG7ng?pwd=h4em Extraction code: h 4 em
Installation Suggestions
It is recommended to use the following method, using a foreign network environment throughout the process. The advantage is that the operation is simple, it will not pollute the computer's Python environment, and when uninstalling, you only need to delete the folder.
之BallonsTranslator-1753724565009.png)
Special Note: Do not download from releases!!!
之BallonsTranslator-1753939789102.png)
Usage Suggestions
Python Location
The Python location will be used in the command line mode later. After running launch_win.bat or launch_win_with_autoupdate.bat, basic environment and version information will appear in the first few lines of the terminal window. Among them are the Python version and Python path, which need to be noted down.
Python version:  3.10.11 (tags/v3.10.11:7d4cc5a, Apr  5 2023, 00:38:17) [MSC v.1929 64 bit (AMD64)]
Python executable:  D:\Tools\BallonsTranslator_dev_src_with_gitpython\ballontrans_pylibs_win\python.exe
Above is my Python version and Python path.
Four Steps and Recommended Configuration
Configuration overview.
之BallonsTranslator-1753939864993.png)
Basically, you only need to replace the endpoint, apikey and override model of LLM_API_Translator with your own configuration to use it.
There are four steps: "Text Detection", "OCR", "Inpainting", and "Translation". For a brief introduction, please refer to Japanese Manga Machine Translation Experience (1) - Overview.
It is recommended to use ctd+mangaocr+lama_large_512 px+LLM_API_Translator.
Specific recommended parameters and comparisons with other options are shown below.
Text Detection
Overall, ysgyolo_S 150 best can filter onomatopoeia in Japanese manga better than ctd.
ctd detection results are as follows.
之BallonsTranslator-1753785072791.png)
ysgyolo_S 150 best detection results are as follows.
之BallonsTranslator-1753785189089.png)
It can be seen that ysgyolo_S 150 best did not detect the text area representing psychological activities on the left side of the third panel.
However, ysgyolo_S 150 best has problems with automatic font size adjustment, which tends to be too large or too small, so it is recommended to use ctd as a text detector. In some cases, we can optimize the automatic adjustment of font size by adjusting parameters, thereby using ysgyolo_S 150 best. See the "Usage Tips" section later for details.
OCR
For the introduction of mangaocr, see Japanese Manga Machine Translation Experience (2) - Saber-Translator.
The effects of mit 48 px, mit 48 px_ctc, and mit 32 px are not much different, and mit 48 px is more recommended. Compared with mangaocr, mit 48 px has much higher accuracy on long texts and can pick colors, but it is slower, and the processing of Furigana is not as good as the latter.
Comparison of recognition accuracy on long texts.
之BallonsTranslator-1753788967897.png)
之BallonsTranslator-1753788999810.png)
Color picking is mainly used for image editing and can be automatically applied to font colors. Since mangaocr cannot pick colors, black text on a black background will appear in manga with white text on a black background, which greatly affects the reading experience.
之BallonsTranslator-1753789202349.png)
之BallonsTranslator-1753789330760.png)
Then there is the processing of Furigana.
之BallonsTranslator-1753789816194.png)
之BallonsTranslator-1753789474836.png)
Finally, let me introduce llm_ocr. I still don't know why gemini 2.5 flash and gemini 2.5 pro can't be used, but gemini 2.0 flash and doubao 1.6 seed can be used. However, the former has low accuracy in recognizing Chinese characters, while the latter has high accuracy but is extremely slow, so it is basically not used.
Here are my prompt words.
You are a high-precision, AI-powered OCR engine specialized in manga and comics. Your task is to meticulously extract text by emulating a human reader's comprehension of the page layout and dialogue flow.\n\nFollow this multi-step process to achieve the highest accuracy:\n\n**Step 1: Initial Text Identification**\n- Scan the entire panel and identify all potential text elements. This includes dialogue in speech bubbles, narration boxes, and sound effects (SFX).\n- Tentatively classify each element.\n\n**Step 2: Detailed Text Block Analysis**\nFor each individual text block (a single speech bubble, narration box, or SFX), perform the following analysis in order:\n\n1. **Aggressive Furigana (ルビ) Filtering:** This is your first and most critical filtering step. You MUST be extremely vigilant in identifying and completely ignoring all furigana (the small phonetic characters, typically hiragana or katakana, found next to or above kanji). Under NO circumstances should any furigana character appear in the final output. Your focus is exclusively on the larger, primary characters.\n\n2. **Orientation and Transcription:** Based on the arrangement of the filtered primary characters, transcribe the text.\n * **Vertical Text (縦書き):** If characters are arranged vertically, transcribe them from **top-to-bottom**. If a block contains multiple vertical columns, read the columns from **right-to-left**.\n * **Horizontal Text (横書き):** If characters are arranged horizontally, transcribe them from **left-to-right**.\n\n3. **Punctuation Preservation:** All original Japanese punctuation marks MUST be retained and placed correctly in the transcribed text. This includes, but is not limited to: various brackets like `「` `」`, `『` `』`, `【` `】`, and parentheses `(` `)`; standard marks like `。` (period), `、` (comma), `!` (exclamation mark), and `?` (question mark); and other common symbols like `…` (ellipsis) and `~` (tilde).\n\n**Step 3: Semantic Grouping and Final Output Generation**\nThis is the most critical phase. You will now assemble the transcribed text blocks into a final, logical sequence based on their meaning and context.\n\n1. **Reading Order:** Process the text blocks according to the panel's natural reading flow (in Japanese manga, this is typically **right-to-left**, then **top-to-bottom**).\n\n2. **Speaker and Thought Cohesion:**\n * **COMBINE:** If a single, continuous thought or sentence from *one speaker* is split across multiple speech bubbles, you **MUST** merge the text from these bubbles into a single, coherent line in the output. A direct visual link (like a connecting tail) is a strong indicator for merging. However, even if bubbles are separate but clearly part of the same continuous statement from the same character, they should be combined.\n * **SEPARATE:** Text from different speakers, distinct and separate thoughts from the same speaker, or text from non-contiguous narration boxes must be placed on separate lines. Each new line should represent a new speaker or a definitive break in thought/narration.\n\n3. **Isolate Sound Effects (SFX):** Sound effects are always considered independent elements. Transcribe each SFX on its own dedicated line.\n\n**Final Output Rules:**\n- The output must be **pure text only**.\n- Do not include translations, summaries, annotations, or any commentary.\n- The language of the output must match the source language of the image.As for why it is written so long, it is because if it is not written like this, LLM will not be obedient...
As for other OCR methods, except for the Dango Translator and the two Google-related OCRs that I haven't tested, the effects are not very good.
Inpainting
Not much difference, choose lama_large_512 px.
Translator
Select LLM_API_Translator, and then fill it in normally. Note that when I use Deepseek V 3, the translation will come with annotations. Changing several sets of prompt words didn't work, but some experts gave effective prompt words, refer to Japanese Manga Machine Translation Experience (2) - Saber-Translator.
Fill in the service provider's baseurl in the endpoint column. Note that the openai format needs to end with v 1. For example, SiliconFlow's https://api.siliconflow.cn/v1/chat/completions should be filled as https://api.siliconflow.cn/v1.
Some Combinations
Actually, it is mainly the method of exclusion, eliminating the ones that are not easy to use first.
The detector first excludes ysgyolo_S 150 best, because there is a font size problem, which is easy to be too large or too small, so (free ones) can only choose ctd.
Then there is the OCR model. Since the BUG Bug Feedback: ctd+mit48px bubble frame edge text not OCRed has not been fixed, only mangaocr can be selected.
The remaining two are the LLM_API_Translator+lama_large_512 px combination.
Therefore, my personal suggested combination is ctd+mangaocr+lama_large_512 px+LLM_API_Translator.
However, as mentioned above, mangaocr has some problems, the most obvious being the decline in OCR accuracy for long texts and the inability to pick colors, so the combination method of ctd+mangaocr+lama_large_512 px+LLM_API_Translator will also have these problems.
Batch Mode
The example in the project documentation is
python launch.py --headless --exec_dirs "[DIR_1],[DIR_2]..."Actually, strictly speaking, this python should be replaced with the Python path you were asked to remember above.
One of my valid examples is as follows.
D:\Tools\BallonsTranslator_dev_src_with_gitpython\ballontrans_pylibs_win\python.exe launch.py --headless --exec_dirs "D:\TargetFolder\data,D:\TargetFolder\document,D:\TargetFolder\image,D:\TargetFolder\readme"Among them, D:\Tools\BallonsTranslator_dev_src_with_gitpython\ballontrans_pylibs_win\python.exe is my Python path.
Usage Tips
Manual Labeling
Click the square in the lower right corner, hold down the right button and slide to make a labeling rectangle appear, as shown in the figure below.
之BallonsTranslator-1753791801845.png)
之BallonsTranslator-1753791823329.png)
Handling Watermarks
之BallonsTranslator-1753720604149.png)
One method is to replace the watermark with empty by "Replace Original Keywords", and then enable filtering of empty OCR results.
Another method is to preprocess the image to remove the watermark.
English Punctuation to Chinese Punctuation
Same as the first method above, replace punctuation marks.
Multi-folder Batch Translation
The BallonsTranslator official documentation provides a batch translation option in command line mode.
python launch.py --headless --exec_dirs "[DIR_1],[DIR_2]..."It can be seen that this requires obtaining the folder path of the Japanese manga to be translated.
Use the following extract_filenames.bat program to batch obtain the absolute paths of files under the parent folder of the parent folder.
For specific usage, refer to https://github.com/WeMingT/extract-filenames.
@echo off

setlocal


:: 1. 设置代码页以支持中文文件名

:: 1. Set the code page to support Chinese filenames (UTF-8)

chcp 65001 > nul


:: 2. 定义相关路径

:: 2. Define relevant paths

set "parent_folder=%~dp0.."

set "output_file=%~dp0filenames_output.txt"


:: 3. 检查父文件夹是否存在

:: 3. Check if the parent folder exists

if not exist "%parent_folder%" (

    echo.

    echo [错误] 父文件夹不存在。

    echo [ERROR] Parent folder does not exist.

    echo.

    echo - 请确保将此脚本放置在目标文件夹的子文件夹中。

    echo - Please ensure this script is placed in a subfolder of the target directory.

    goto end

)


:: 4. 使用 PowerShell 处理所有逻辑并直接生成输出文件

:: 4. Use PowerShell to handle all logic and generate the output file directly

powershell -NoProfile -ExecutionPolicy Bypass -Command ^

    "$ParentPath = [System.IO.Path]::GetFullPath('%parent_folder%'); " ^

    "if (-not (Test-Path -LiteralPath $ParentPath)) { exit 1; } " ^

    "$Files = Get-ChildItem -LiteralPath $ParentPath -File | Sort-Object { [regex]::Replace($_.Name, '\d+', { $args[0].Value.PadLeft(20) }) }; " ^

    "if ($Files.Count -eq 0) { exit 2; } " ^

    "$FilenamesWithExt = ($Files | ForEach-Object { $_.Name }) -join ','; " ^

    "$FilenamesNoExt = ($Files | ForEach-Object { $_.BaseName }) -join ','; " ^

    "$AbspathWithExt = ($Files | ForEach-Object { $_.FullName }) -join ','; " ^

    "$AbspathNoExt = ($Files | ForEach-Object { Join-Path $_.DirectoryName $_.BaseName }) -join ','; " ^

    "$BallonsTranslatorCmd = \"D:\Tools\BallonsTranslator_dev_src_with_gitpython\ballontrans_pylibs_win\python.exe launch.py --headless --exec_dirs `\"$AbspathNoExt`\"\"; " ^

    "$OutputContent = \"文件名:`r`n$($FilenamesWithExt)`r`n`r`n文件名(无后缀):`r`n$($FilenamesNoExt)`r`n`r`n绝对路径:`r`n$($AbspathWithExt)`r`n`r`n绝对路径(无后缀):`r`n$($AbspathNoExt)`r`n`r`nBallonsTranslator批处理路径:`r`n$($BallonsTranslatorCmd)\"; " ^

    "[System.IO.File]::WriteAllText('%output_file%', $OutputContent, [System.Text.Encoding]::UTF8);"


:: 5. 检查 PowerShell 的退出代码以进行错误处理

:: 5. Check PowerShell's exit code for error handling

if %errorlevel% == 2 (

    echo.

    echo [提示] 父文件夹中没有找到任何文件。

    echo [INFO] No files found in the parent folder.

    goto end

)

if %errorlevel% == 1 (

    echo.

    echo [错误] PowerShell 无法解析父文件夹路径。

    echo [ERROR] PowerShell could not resolve the parent folder path.

    goto end

)


:: 6. 在屏幕上显示结果

:: 6. Display the results on the screen

echo.

echo -------------------- 结果 / Results --------------------

echo.

type "%output_file%"

echo.

echo ---------------------------------------------------------

echo.

echo 结果已保存到: %output_file%

echo Results have been saved to: %output_file%


:end

echo.

pause

exit /b
Multi-folder Translation Result Batch Packaging
We found that the translation results of Japanese manga are in the result folder, so we need to batch package the result folder. This can be done by the following pack_results.bat program.
For specific usage, refer to https://github.com/WeMingT/pack-results.
@echo off

chcp 65001 >nul


echo.

echo ========================================

echo     Result文件夹批量打包工具

echo ========================================

echo.


:: 检查是否安装了7-Zip

echo 正在检查7-Zip是否安装...

where 7z >nul 2>nul

if %errorlevel% neq 0 (

    echo.

    echo 错误:未找到7-Zip程序!

    echo 请安装7-Zip或确保7z.exe在PATH环境变量中。

    echo 下载地址:https://www.7-zip.org/

    echo.

    pause

    exit /b 1

)

echo 7-Zip检查通过。

echo.


:: 获取当前目录

set "current_dir=%cd%"

echo 当前工作目录:%current_dir%

echo.


:: 创建输出目录

echo 正在准备输出目录...

set "output_dir=%current_dir%\zip_output"

if not exist "%output_dir%" (

    mkdir "%output_dir%"

    echo "已创建输出目录:%output_dir%"

) else (

    echo "输出目录已存在:%output_dir%"

)

echo.


:: 创建日志文件

for /f "tokens=1-3 delims=/ " %%a in ("%date%") do set "mydate=%%a-%%b-%%c"

for /f "tokens=1-3 delims=:. " %%a in ("%time%") do set "mytime=%%a-%%b-%%c"

set "log_file=%output_dir%\pack_log_%mydate%_%mytime%.txt"


echo 准备写入日志文件...

echo 开始打包操作 - %date% %time% > "%log_file%" 2>nul

if exist "%log_file%" (

    echo "工作目录: %current_dir%" >> "%log_file%"

    echo "输出目录: %output_dir%" >> "%log_file%"

    echo. >> "%log_file%"

    echo "日志文件已创建:%log_file%"

) else (

    echo 警告:无法创建日志文件。打包过程仍将继续,但不会记录日志。

)

echo.


echo ========================================

echo           开始处理文件夹

echo ========================================

echo.


:: 计数器

set /a total_folders_checked=0

set /a success_count=0

set /a error_count=0

set /a skipped_count=0


:: 创建临时文件列出所有文件夹

set "temp_list=%temp%\folder_list_%random%.txt"

dir /b /ad > "%temp_list%" 2>nul


:: 逐行读取文件夹列表

for /f "usebackq delims=" %%i in ("%temp_list%") do (

    if /i not "%%i"=="zip_output" (

        call :process_folder "%%i"

    )

)


:: 清理临时文件

if exist "%temp_list%" del "%temp_list%"

goto :show_results


:process_folder

set "folder_name=%~1"

set /a total_folders_checked+=1


echo ----------------------------------------

echo 正在检查文件夹: "%folder_name%"


:: 检查是否存在result文件夹

if exist "%folder_name%\result" (

    echo "  -> 找到result文件夹,准备打包..."

    :: 使用7z进行压缩,直接压缩result文件夹内的内容到zip文件根目录

    pushd "%folder_name%\result" >nul 2>nul

    if errorlevel 1 (

        echo "  -> [失败] 无法访问result子目录: %folder_name%\result"

        set /a error_count+=1

        if exist "%log_file%" echo [失败] %folder_name% - 无法访问result目录 - %date% %time% >> "%log_file%"

    ) else (

        echo "  -> 正在压缩: %output_dir%\%folder_name%.zip"

        7z a -tzip "%output_dir%\%folder_name%.zip" * >nul 2>nul

        if errorlevel 1 (

            echo "  -> [失败] 打包文件夹时出错: %folder_name%"

            set /a error_count+=1

            if exist "%log_file%" echo [失败] %folder_name% - 打包错误 - %date% %time% >> "%log_file%"

        ) else (

            echo "  -> [成功] 打包完成: %folder_name%.zip"

            set /a success_count+=1

            if exist "%log_file%" echo [成功] %folder_name% - %date% %time% >> "%log_file%"

        )

        popd >nul 2>nul

    )

) else (

    echo "  -> [跳过] 未找到result文件夹在: %folder_name%"

    set /a skipped_count+=1

    if exist "%log_file%" echo [跳过] %folder_name% - 未找到result文件夹 - %date% %time% >> "%log_file%"

)

echo.

goto :eof


:show_results

echo ----------------------------------------

echo.

:: 显示统计结果

echo ========================================

echo           处理完成统计

echo ========================================

echo 总共检查文件夹数: %total_folders_checked%

echo 成功打包: %success_count%个

echo 失败: %error_count%个

echo 跳过: %skipped_count%个

echo.

echo "输出目录: %output_dir%"

if exist "%log_file%" echo "日志文件: %log_file%"

echo.


:: 写入日志文件总结

if exist "%log_file%" (

    echo. >> "%log_file%"

    echo ===== 打包完成统计 ===== >> "%log_file%"

    echo 总共检查文件夹数: %total_folders_checked% >> "%log_file%"

    echo 成功打包: %success_count%个 >> "%log_file%"

    echo 失败: %error_count%个 >> "%log_file%"

    echo 跳过: %skipped_count%个 >> "%log_file%"

    echo 完成时间: %date% %time% >> "%log_file%"

)


::统计结果提示

if %total_folders_checked% equ 0 (

    echo.

    echo 注意:当前目录下没有找到任何子文件夹。

    echo 请确保您在包含项目子文件夹的父目录中运行此脚本。

) else (

    if %success_count% gtr 0 (

        echo.

        echo 处理完成!成功打包了 %success_count% 个文件夹的result内容。

    ) else (

        echo.

        echo 注意:已检查 %total_folders_checked% 个文件夹,但均未找到名为 result 的子文件夹。

        echo 请确保:

        echo 1. 您在正确的父目录中运行此脚本。

        echo 2. 目标子文件夹中确实存在名为 result 的文件夹。

    )

)

echo.


echo 按任意键退出...

pause >nul
ysgyolo_S 150 best Font Size Optimization
First of all, it needs to be stated that this method has limitations and is only suitable for cases where the font size of all pictures to be translated in the same manga is similar.
You can randomly select 1/20 from the manga as a test sample.
The method is specifically to adjust the font size multiplier, font size max and font size min parameters of ysgyolo_S 150 best.
I generally set font size multiplier = 1.6, font size max = 34 and font size min = -1. Of course, this is not universal and needs to be adjusted according to specific manga pictures.
The principle is that font size multiplier controls the magnification of the font size, font size min controls the minimum font size, and font size max controls the maximum font size.
Complete Workflow
We have the following Japanese manga that needs to be translated in the Manga to be translated directory.

Paste the folder containing the extract_filenames.bat program to Manga to be translated.
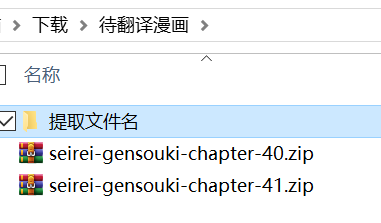
Double-click to run the extract_filenames.bat program. Get the following results.
文件名:
seirei-gensouki-chapter-40.zip,seirei-gensouki-chapter-41.zip

文件名(无后缀):
seirei-gensouki-chapter-40,seirei-gensouki-chapter-41

绝对路径:
C:\Users\xxx\Downloads\待翻译漫画\seirei-gensouki-chapter-40.zip,C:\Users\xxx\Downloads\待翻译漫画\seirei-gensouki-chapter-41.zip

绝对路径(无后缀):
C:\Users\xxx\Downloads\待翻译漫画\seirei-gensouki-chapter-40,C:\Users\xxx\Downloads\待翻译漫画\seirei-gensouki-chapter-41
Unzip the Japanese manga compressed package to be translated and run
D:\Tools\BallonsTranslator_dev_src_with_gitpython\ballontrans_pylibs_win\python.exe launch.py --headless --exec_dirs "C:\Users\xxx\Downloads\待翻译漫画\seirei-gensouki-chapter-40,C:\Users\xxx\Downloads\待翻译漫画\seirei-gensouki-chapter-41"Among them, D:\Tools\BallonsTranslator_dev_src_with_gitpython\ballontrans_pylibs_win\python.exe is my Python path.
After the translation is finished, copy the pack_results.bat program to the Manga to be translated folder, double-click to run it, and you can get the translated zip file.
Usage Experience
BallonsTranslator may be the translator I spend the most time on, but the effect has not improved much. The reason is obvious, because it almost "limits" the combination method, and the exploration of other combination methods is almost useless (of course, readers are also welcome to leave better combination methods and parameter configurations).
The biggest advantage of BallonsTranslator over Saber-Translator, I personally think, is the ctd detector and large-scale batch translation, as well as diverse model choices.
I don't use BallonsTranslator much now. I use manga-image-translator more often. It solves the problem of long text OCR accuracy decline and inability to pick colors in the ctd+mangaocr+lama_large_512 px+LLM_API_Translator combination in BallonsTranslator, and goes a step further in detection, capable of detecting rotated bubbles. This is what I will introduce later.
Partial Parameter Description
Mainly obtained by asking gemini 2.5 pro, for reference only.
ctd Parameter Description
| Parameter | Example Value | Explanation |
|---|---|---|
detect_size | 1280 | Detection Size. This is the size to which the input image is resized for model inference. The model performs text detection on images at this resolution. Generally speaking, - Larger value: Can detect smaller text, potentially higher accuracy, but slower processing speed and larger VRAM/RAM consumption. - Smaller value: Faster processing speed, lower resource consumption, but may miss tiny text in the image. |
det_rearrange_max_batches | 8 | Detection Rearrange Max Batches. This is a performance optimization parameter. After detecting multiple text regions, the system may crop these regions for batch processing (e.g., for subsequent recognition or filtering). This parameter limits the maximum number of batches that can be processed at one time during the rearrangement and batch processing phase. Increasing this value may increase throughput with a powerful GPU, but will increase VRAM usage. |
device | "cpu" | Running Device. Specifies the hardware used to run the detection model. - "cpu": Use the central processing unit. Good versatility, no special hardware required, but slow speed.- "cuda" or "gpu": Use NVIDIA GPU for calculation. Speed is much faster than CPU, it is the first choice for deep learning inference, but requires correct installation of CUDA environment and corresponding drivers. |
font size multiplier | 1.0 | Font Size Multiplier. An adjustment factor, possibly used for internal font size estimation or filtering logic. A value of 1.0 means no adjustment. If set to a value greater than 1.0, it may tend to keep larger text when filtering; conversely, less than 1.0 may tend to keep smaller text. This is a fine-tuning parameter, usually keep the default value. |
font size max | -1 | Max Font Size. Parameter used to filter detection results. It sets an upper limit on the font size (usually in pixels) of the detected text. If the estimated font size of the detected text box exceeds this value, the result will be discarded. This can be used to exclude oversized titles or non-text graphic elements. A value of -1 usually means no upper limit, i.e., accepting text of all sizes. |
font size min | -1 | Min Font Size. Corresponding to font size max, it sets the lower limit of the font size of the detected text. Text smaller than this size will be filtered out. This is a very useful parameter that can effectively remove noise or very tiny, meaningless text in the image. A value of -1 usually means no lower limit, i.e., not filtering any results due to small font size. |
mask dilate size | 2 | Mask Dilate Size. This is an image post-processing parameter. When the model detects text, it often generates a "mask", which is a binary image indicating the text area. The Dilation operation "thickens" or expands the white area of this mask. The function of this parameter is: - Connect broken characters or words to form a more complete text block. - Make the detection box wrap the entire text line more completely. The size of the value (such as 2) determines the degree of dilation. The larger the value, the stronger the dilation effect. |
ysgyolo Parameter Description
| Parameter | Example Value | Explanation |
|---|---|---|
model path | "data/models/ysgyolo_S150best.pt" | Model File Path. Points to the pre-trained model weight file. .pt is a common extension for PyTorch model files. The file name ysgyolo_S150best may indicate that this is a YOLO architecture S (Small) size model, which achieved the best results when trained at the 150th epoch. |
merge text lines | true | Merge Text Lines. A boolean value (true or false). If set to true, the algorithm will try to merge spatially adjacent and reasonably arranged lines into a larger text block after detecting multiple independent text lines. This is very useful for identifying paragraphs or complete dialogue boxes. |
confidence threshold | 0.3 | Confidence Threshold. This is a floating point number between 0 and 1. The model gives a confidence score for each detection box, indicating "how sure it is that this is a text box". Only detection results with scores higher than this threshold (such as 0.3, i.e., 30%) will be kept. Increasing this value can reduce false positives, but may miss some unclear text; decreasing this value does the opposite. |
IoU threshold | 0.5 | Intersection over Union Threshold. Used for the "Non-Maximum Suppression" (NMS) process. When multiple detection boxes overlap and point to the same text target, NMS retains the one with the highest confidence and suppresses other boxes whose overlap (IoU) with it exceeds this threshold (such as 0.5). This parameter is used to eliminate redundant detection results and ensure that a text target is detected only once. |
font size multiplier | 1.0 | Font Size Multiplier. An adjustment factor used for internal font size estimation or filtering logic. A value of 1.0 means no adjustment. This parameter can be used to fine-tune font size related post-processing, generally keep the default value. |
font size max | -1 | Max Font Size. Used to filter detection results. Sets an upper limit on the estimated font size of the detected text (unit is usually pixels). If the estimated font size in the detection box exceeds this value, the result is discarded. This can be used to exclude huge titles or graphics mistakenly detected as text. A value of -1 means no upper limit. |
font size min | -1 | Min Font Size. Corresponding to font size max, sets the lower limit of font size. Text smaller than this size will be filtered out, which can effectively remove image noise or meaningless tiny text. A value of -1 means no lower limit. |
detect size | 1024 | Detection Size. Resize the input image to this size (such as 1024 x 1024) and send it to the model for inference. Larger value, stronger detection ability for small text, but slower speed and larger resource consumption. Smaller value, faster speed, but may miss small text. |
device | "cpu" | Running Device. Specifies the hardware used for model inference. - "cpu": Use the central processing unit, universal but slow.- "cuda" or "gpu": Use NVIDIA GPU, requires corresponding hardware and CUDA environment, much faster. |
label | {"vertical_textline": true, ...} | Label Filter. This is a very critical parameter that defines which types of text you want to keep from the model output. The model can detect text in multiple directions, and you can selectively keep them by setting true or false:- vertical_textline: Vertical text line.- horizontal_textline: Horizontal text line.- angled_vertical_textline: Angled vertical text line.- angled_horizontal_textline: Angled horizontal text line.- textblock: Text block (may be merged from multiple text lines). |
source text is vertical | true | Source Text is Vertical. This is a hint to the post-processing algorithm. When set to true, it tells the algorithm that the main text flow in the image is vertical (e.g. Japanese manga). This information can help the merge text lines function more accurately merge vertically arranged text lines into text blocks. |
mask dilate size | 2 | Mask Dilate Size. An image post-processing parameter. The model may generate a pixel-level mask for each text. The Dilation operation expands the range of this mask. This parameter can help connect broken characters, or make the finally generated bounding box wrap the text more completely, avoiding edge characters being truncated. The larger the value, the stronger the dilation effect. |
llm_ocr Parameter Description
| Parameter | Example Value | Explanation |
|---|---|---|
provider | "OpenAI" | Service Provider. Specifies the provider or API compatible type of the LLM service used. Setting to "OpenAI" usually means that the system uses an interface compatible with the OpenAI API format. |
api_key | "[REDACTED]" | API Key. Credentials used to authenticate with the LLM service provider. This is sensitive information that must be replaced, please fill in your own valid API key. |
endpoint | "[PROVIDER_ENDPOINT]" | API Endpoint. The specific server URL to which API requests are sent. You need to set it to the actual endpoint address provided by the LLM service provider you are using. |
model | "" (Empty string) | Model Name. Used to specify the LLM model to use. In this configuration, this field is empty, and the actual model used is determined by the override_model parameter. |
override_model | "[MODEL_NAME]" | Override Model Name. This parameter overrides the setting of the model field and forces the use of the specified model. Please fill in the specific model name you want to use here (e.g. gpt-4-vision-preview, etc.). |
language | "Auto Detect" | Language. Specifies the language of the text in the image. Setting to "Auto Detect" means letting the LLM automatically detect and identify the language. If the language of the image is known in advance (such as "Japanese", "Chinese", "English"), explicitly specifying it can improve recognition accuracy. |
prompt | "Recognize the text in this image." | User Prompt. This is the direct instruction sent to the LLM along with the image for each API request. It tells the LLM the core goal of the current task: recognize the text in the image. This is usually a relatively generic, immediate instruction. |
system_prompt | (Long text) | System Prompt/Role Setting. This is a very critical "meta-instruction" provided to the LLM before the conversation starts, used to set its role, code of conduct, and detailed task instructions. This detailed prompt shapes the LLM into a professional manga OCR engine and gives extremely specific rules: 1. Role Definition: "You are a high-precision, AI-powered OCR engine specialized in manga and comics". 2. Core Rules: Strictly filter Furigana, correctly handle vertical and horizontal text, retain all original punctuation marks. 3. Advanced Logic: Follow the manga reading order (right to left, top to bottom), merge continuous dialogue of the same character into one line, process text of different characters or sound effects (SFX) in separate lines. 4. Output Format: Finally output pure text only. This system prompt is the key to achieving high-quality, structured manga OCR. |
proxy | "" (Empty string) | Proxy Server. Proxy server address for network requests. If left empty, connect directly to the API endpoint. If a proxy address is filled in (such as http://127.0.0.1:7890), all API requests will be sent through this proxy. This is very useful when you need to bypass network restrictions or firewalls. |
delay | 1.0 | Request Delay. This is a rate control parameter in seconds. It defines the minimum time to wait between two consecutive API requests. Setting to 1.0 means that the program will wait at least 1 second after each request before initiating the next request to avoid calling the API too frequently. |
requests_per_minute | 15 | Requests Per Minute. Another rate control parameter used to limit the maximum number of API requests that can be made within one minute. Setting to 15 means that within a one-minute window, at most 15 API calls can be made. This is usually to comply with the service provider's Rate Limit Policy and prevent temporary bans due to too frequent requests. |
mit 48 px Parameter Description
| Parameter | Example Value | Explanation |
|---|---|---|
chunk_size | 16 | Batch Size. It defines the number of text line images sent to the OCR model for batch recognition at one time. The system will group multiple detected text lines (already cropped into independent images), each group containing up to 16 images, and then send this entire group (batch) to the model for parallel processing. - Increasing this value: With a powerful GPU, the total recognition throughput (lines recognized per second) can be significantly improved, but it will occupy more VRAM. - Decreasing this value: Can reduce memory/VRAM consumption, suitable for devices with limited hardware resources. |
device | "cpu" | Running Device. Specifies the hardware used to run the OCR model. - "cpu": Use the central processing unit. Good versatility, no special hardware required, but recognition speed is relatively slow.- "cuda" or "gpu": Use NVIDIA GPU for calculation. Speed is much faster than CPU, it is the first choice for batch OCR recognition, but requires an NVIDIA graphics card supporting CUDA and correct environment configuration. |
lama_large_512 px Parameter Description
| Parameter | Example Value | Explanation |
|---|---|---|
inpaint_size | 1536 | Inpaint Size. This is the processing size to which the input image is resized before performing the image inpainting task. The model will calculate on the image of this resolution. - Why set this value? Although the model is trained on 512 px data, enlarging the image to be processed to a higher resolution (such as 1536px) before inpainting can generate finer and higher quality results, effectively avoiding blurring or pixelation in the inpainted area. - Impact: The larger the value, the finer the inpainting effect, but the slower the processing speed, and the more memory/VRAM consumed. Conversely, smaller values mean faster speed but may sacrifice details. |
device | "cpu" | Running Device. Specifies the hardware used to run the inpainting model. - "cpu": Use the central processing unit. Good versatility, but for computationally intensive tasks like image inpainting, the speed will be very slow.- "cuda" or "gpu": Use NVIDIA GPU for calculation. Speed far exceeds CPU, strongly recommended option for image inpainting tasks. Requires correct installation of CUDA environment and drivers. |
precision | "fp32" | Computational Precision. This parameter defines the floating point precision used by the model during calculation. - "fp32" (Single Precision): Use 32-bit floating point numbers. This is the standard, most precise mode, providing the highest numerical stability, but memory usage and calculation amount are also the largest.- "fp16" (Half Precision): Use 16-bit floating point numbers. On compatible GPUs (such as NVIDIA RTX series), it can significantly improve speed and reduce VRAM usage by about half, but there may be minor precision loss (usually negligible for image inpainting tasks).This is an optimization option to trade off between performance and resource consumption. |
LLM_API_Translator Parameter Description
| Parameter | Example Value | Explanation |
|---|---|---|
provider | "OpenAI" | Service Provider. Specifies the format standard followed by the API used. "OpenAI" means that the system will build and send requests in the OpenAI API format, even if the endpoint points to a local or third-party service. |
apikey | "[REDACTED_API_KEY]" | API Key. Credentials used to authenticate with the LLM service provider. This is sensitive information that must be replaced, you need to fill in your own valid API key. |
multiple_keys | "" (Empty string) | Multiple Keys List. An optional field where multiple API keys separated by commas can be filled in. If provided, the system can rotate these keys, helping to distribute request load or bypass rate limits of a single key. |
model | "OAI: gpt-3.5-turbo" | Model Name. Specifies the default LLM model to use. The OAI: prefix may be a convention used internally by this application to identify official OpenAI models. This setting can be overridden by the override model parameter. |
override model | "[CUSTOM_MODEL_NAME]" | Override Model Name. This parameter forces the use of the specified model, overriding the setting of the model field. This is very useful for using locally hosted models (such as via LM Studio, Jan, etc.) or specific models provided by third-party vendors. |
endpoint | "[API_ENDPOINT_URL]" | API Endpoint. The specific server URL to which API requests are sent. It can be the official OpenAI address, a third-party service provider's address, or a local server address (such as http://localhost:3000/v1). |
prompt template | "Please help me to... {to_lang}..." | Prompt Template (Non-Chat Mode). This is a template used to build instructions sent to non-chat models. {to_lang} is a placeholder that will be automatically replaced with the target language (such as "Simplified Chinese") when the program runs. |
chat system template | "You are a professional... {to_lang}." | Chat System Template. This is the system prompt or role setting designed for chat models (such as GPT-3.5/4). It tells the model its role (professional translation engine), translation style (colloquial, elegant and fluent) and code of conduct (translate only, no explanation, retain original format, etc.) before the conversation starts. This is a key part of achieving high-quality translation. |
chat sample | (Japanese-Chinese translation example) | Chat Sample (Few-shot Prompting). This is a "few-shot" example provided to the model, showing it the expected input (source) and output (target) format and quality. In this way, the model can be guided to better follow instructions and generate translation results with correct format and style meeting requirements. |
invalid repeat count | 2 | Invalid Repeat Count. A quality control parameter. If the model returns invalid or garbled results for 2 consecutive times, the system may stop retrying or take other corrective measures. |
max requests per minute | 60 | Max Requests Per Minute. A rate control parameter limiting the maximum number of requests sent to the API per minute to 60. This is used to comply with the service provider's rate limit policy and prevent the account from being temporarily disabled due to too frequent requests. |
delay | 0.3 | Request Delay. The minimum waiting time (seconds) between two consecutive API requests. Setting to 0.3 seconds, working together with max requests per minute, smooths the request rate. |
max tokens | 8192 | Max Tokens. Limits the maximum number of tokens (can be seen as words or character fragments) generated by the LLM in a single response. This helps control costs and prevent the model from generating excessively long useless output. |
temperature | 0.5 | Temperature. Controls the randomness of the output. Lower values (such as 0.2) make the output more deterministic and conservative; higher values (such as 0.8) make the output more creative and diverse. 0.5 is a relatively balanced value, ensuring translation accuracy while having a bit of natural fluency. |
top p | 1.0 | Top-p (Nucleus Sampling). Another method to control randomness. A value of 1.0 means Top-p sampling is not enabled. If set to a lower value (such as 0.9), the model will select the next word from a small range of vocabulary with a cumulative probability of 90%, thereby reducing the probability of generating rare words. Usually only adjust one of temperature or top p. |
retry attempts | 12 | Retry Attempts. The maximum number of times the system will try to resend the request when an API request fails (such as network problems or server errors). |
retry timeout | 10 | Retry Timeout. The number of seconds to wait before each retry. |
proxy | "" (Empty string) | Proxy Server. Proxy server address for network requests. If left empty, connect directly to the API endpoint. If filled in, all API requests will be sent through this proxy, which can be used to bypass network restrictions. |
frequency penalty | 0.0 | Frequency Penalty. A number between -2.0 and 2.0. Positive values decrease the model's likelihood to repeat the same line verbatim. 0.0 means no penalty is applied, which is usually appropriate for translation tasks. |
presence penalty | 0.0 | Presence Penalty. A number between -2.0 and 2.0. Positive values increase the model's likelihood to talk about new topics. 0.0 means no penalty is applied. |
low vram mode | false | Low VRAM Mode. A boolean value, possibly used when running models locally. When set to true, the system may take measures to reduce VRAM usage, such as reducing batch size or using lower precision model loading methods. For pure API calls, this parameter may be invalid. |
Other Tutorials for Reference
I pay less attention, welcome to supplement!